4 quick tips for a less stressful move
Moving soon? Overwhelming, isn’t it!?
Now I’m willing to bet you’re already a highly organized person. We all have to be these days, just to navigate the complexities of life in the 21st century. But you’re also smart enough to know that taking on an intense high-anxiety project like moving from one house to another–on top of all that you already juggle–can put your stress levels over the top.
Unless you upgrade your juggling skills.
These quick tips will help you feel more in control:
1. Think like a professional project manager
Moving is a major project, with many sub-projects, deadlines, and dependencies (tasks that must be completed before another task can begin). So a single-page checklist is not going to be robust enough to handle all that complexity.
Start by deciding on a single trusted system for all your moving-related tasks. Your trusted system might be the task management software you already use at work, a pretty mind map, or even a corkboard in the family room at home. But most people will find that an app that works on all their devices is best, so you can add or edit tasks while you’re on the go.
Be sure to use that trusted system for all tasks related to the move. In other words, if you’re using software, you must record every task inside that software.
Here’s how NOT to manage this project: You keep some tasks in your software, plus handwritten lists on the fridge, plus sticky notes littering your desktop, plus a few tasks rattling around in your brain (because you’re absolutely sure you won’t forget them). That way lies madness!
2. Group similar tasks into “buckets”
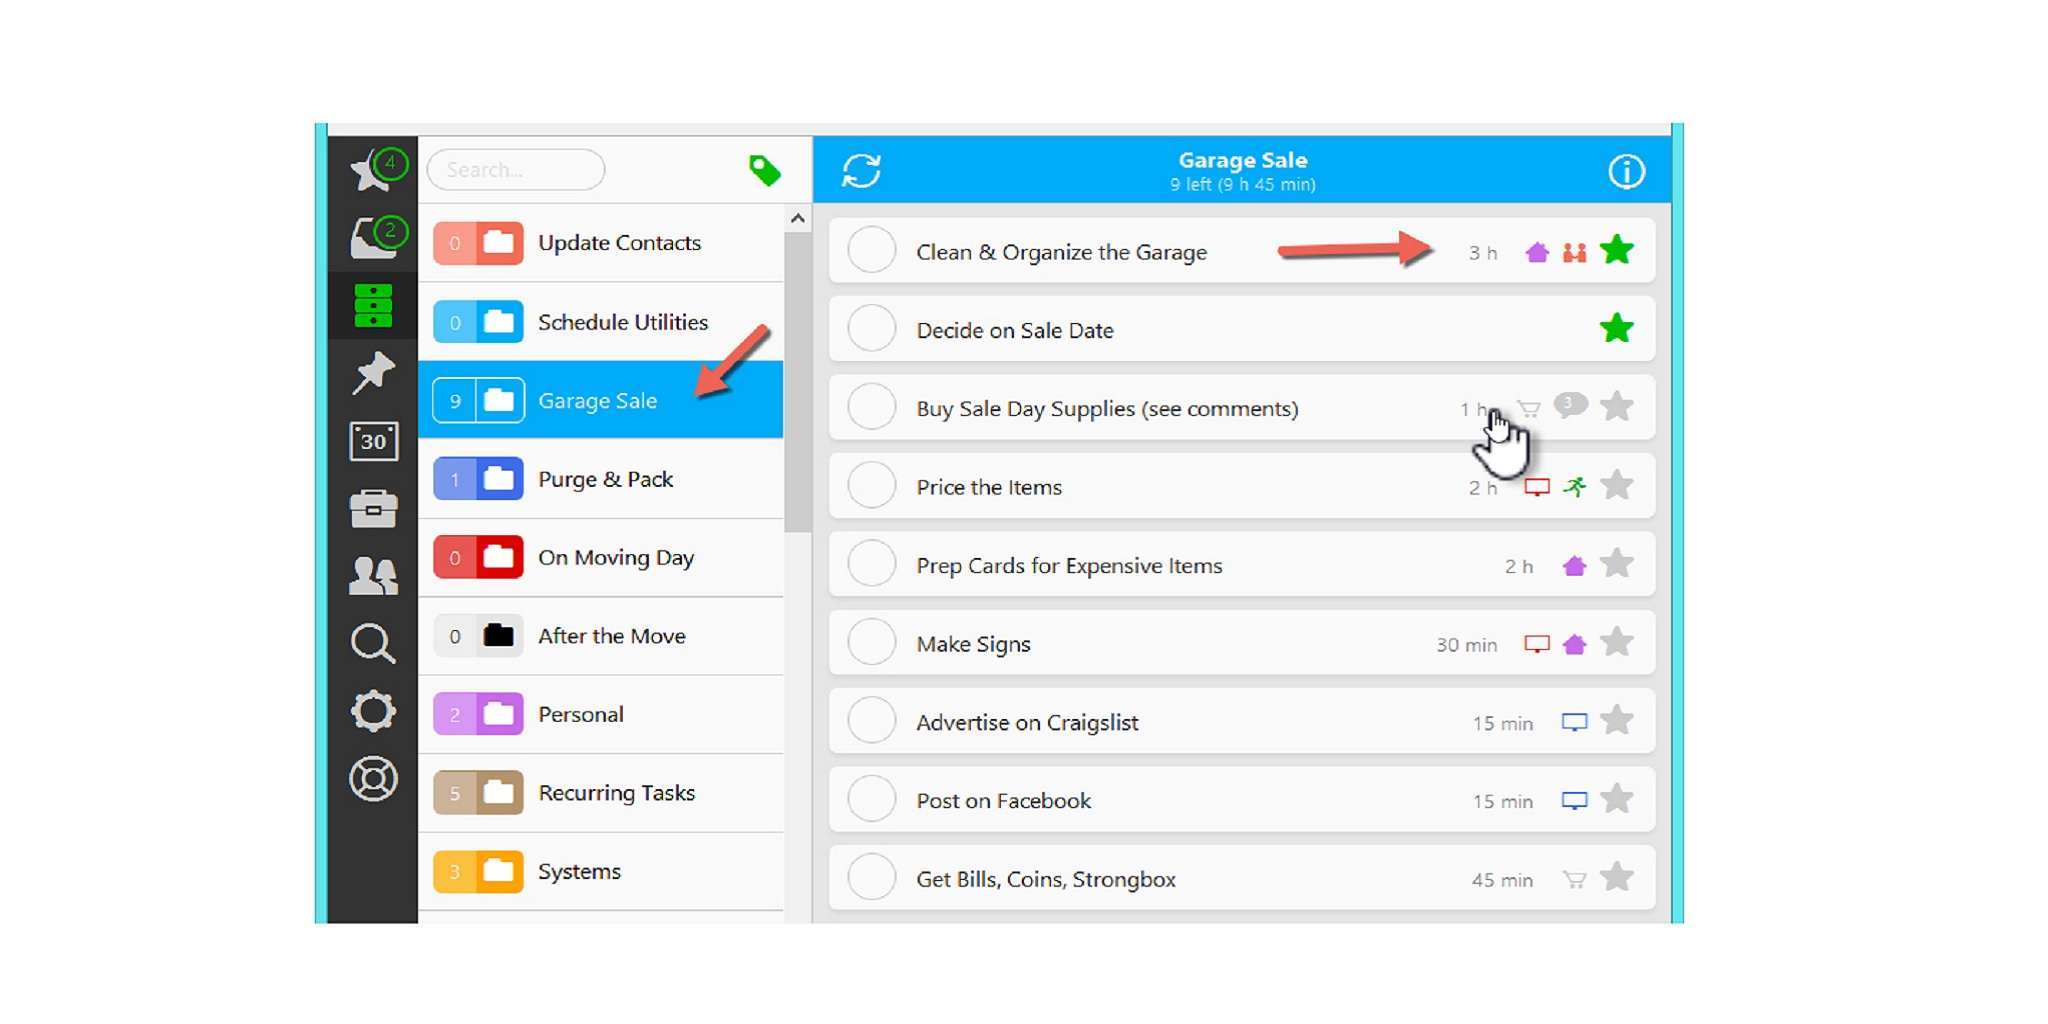
To give you an idea of how your Smooth Move Project would look inside Nozbe, here’s an example…

In this example, you can see that I’ve created six projects related to the move (Update Contacts, Schedule Utilities, Garage Sale, Purge & Pack, On Moving Day, and After the Move).
Next, I’ve added nine tasks to the Garage Sale Project. You’ll notice that to the right of each task are time estimates (for instance, “1 h” is one hour) and other symbols. These symbols make it a piece of cake for me to filter tasks by location (for example, errands or at home or at work), by who else is involved (I definitely want other people helping me clean that garage, for instance!), and even by my energy level.
All the labels are completely customizable … a perfectionist’s dream app.
3. Create a Smooth Move binder
Your software (or corkboard) is great for managing tasks, but you’ll also need something to manage the inevitable paperwork. And be sure to get some clear plastic sleeves, to hold all the smaller items, like box labels and “fragile” stickers.
Your binder might include:
- Documents for your house sale and/or purchase
- Rental agreements
- Estimates from several moving companies
- Contracts with the movers you choose
- Box labels
- Garage sale price stickers
- Kids’ school records
- Contact info (in case your phone dies)
- And more
If you are not storing many documents, the 1-inch size will be plenty. If you are storing a lot of documents, you’ll probably need a 1½- or 2-inch binder.
Get something sturdy. You’re going to be using it a lot. I use Staples’ “Better Binder,” a heavy-duty D-ring binder. I can’t imagine planning a move without it!
4. Pack your kitchen with your new home in mind
If you have a lot of items in your kitchen, try to get or draw a rough plan of the cupboards and kitchen layout in your new home before you move. Even better, take photos (more about this in a moment).
You’ll want to know how many drawers there are, whether they are deep or narrow, how many cupboards (deep and narrow), if there are Lazy Susans, what places are too high for you to reach, and so on.
Ideally, you’ll want to unpack items where they will be handiest. For instance:
- The kettle, coffee maker, coffee and teas near the sink
- The cutlery drawer and most-used dishes, mugs, and glasses near the dishwasher
- Pots and pans near the stove
- Spices near the food prep area
Now, before you pack a single kitchen box, take the time to imagine where everything will go in the new kitchen. Here’s how:
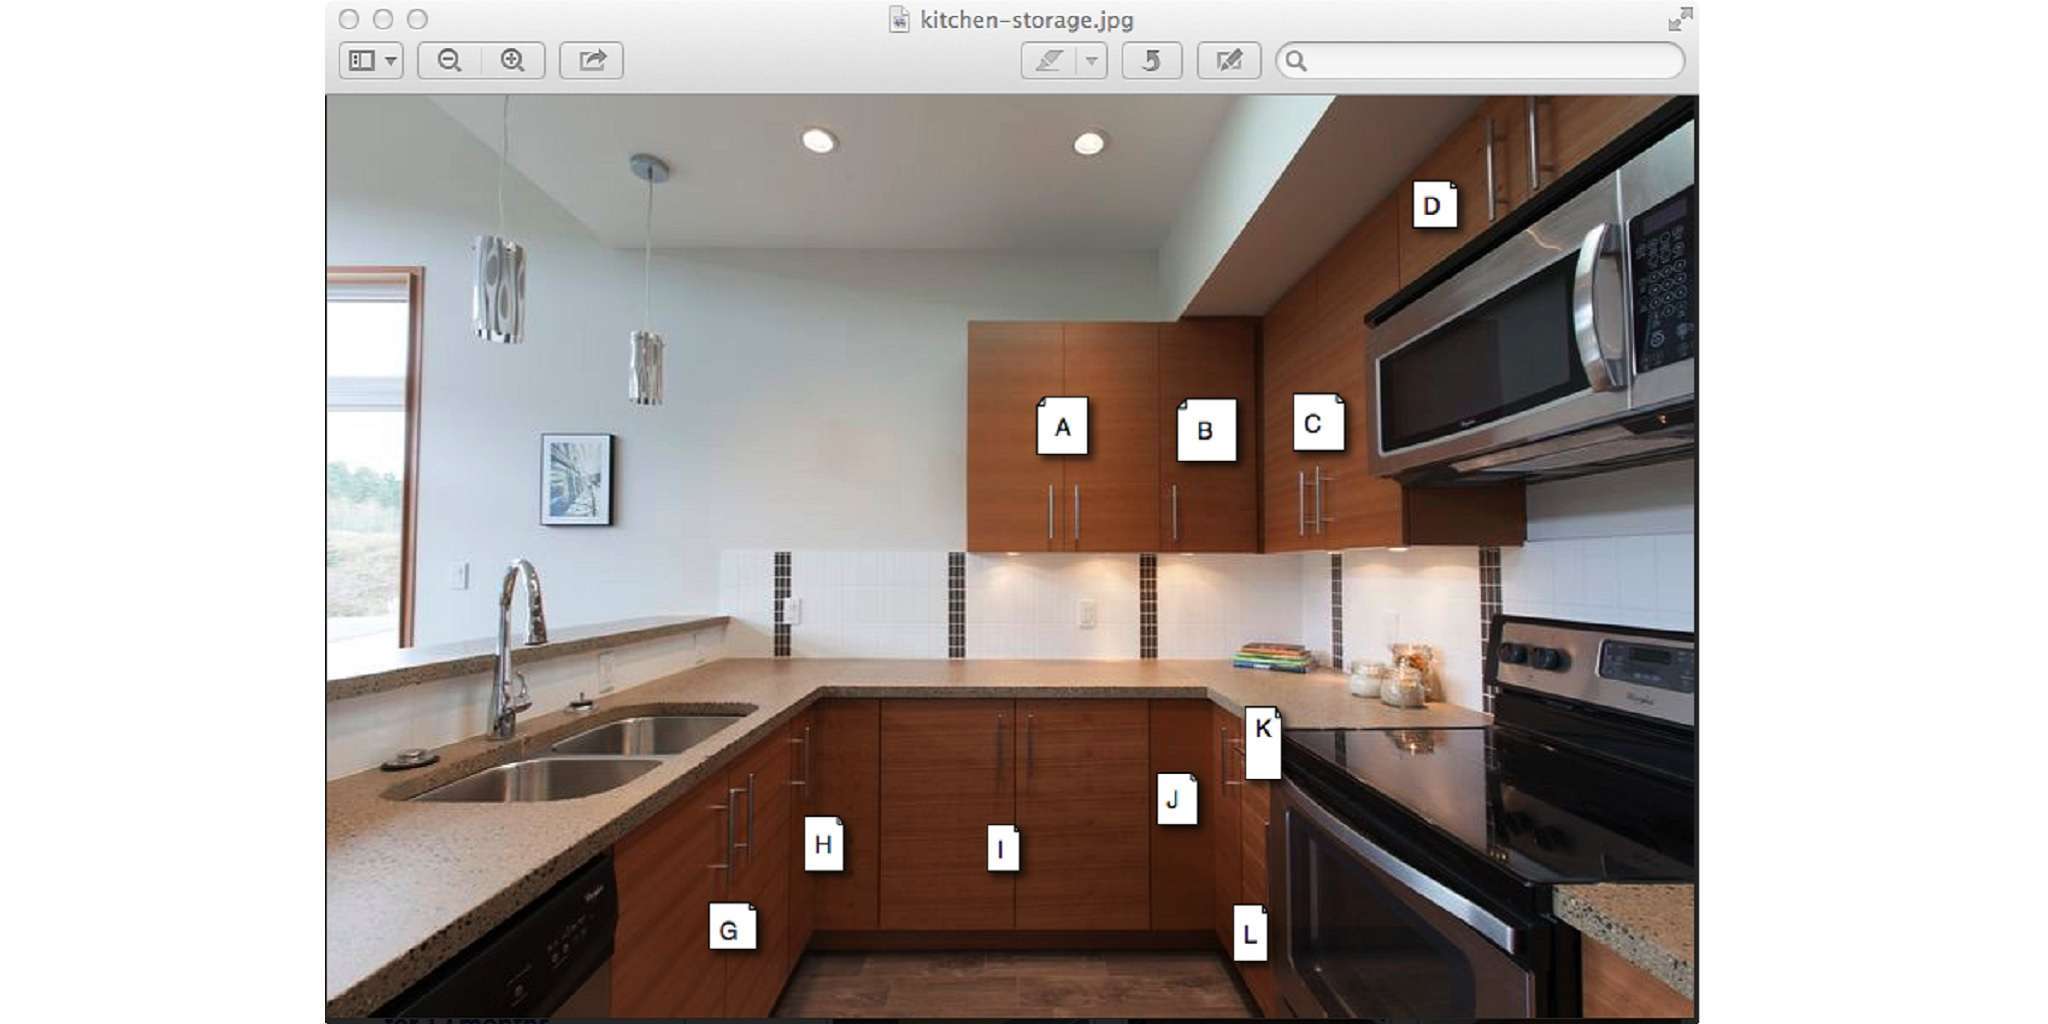
First, take photos of every part of your new kitchen
There will be some overlap, but make sure you can clearly see each and every area where kitchen and pantry things can be stored.
Next, label each storage area
In my example below, I used a screen capture tool called SnagIt to add the letters to designate storage areas. You could also use Jing, a free alternative that works on both PC and Mac.

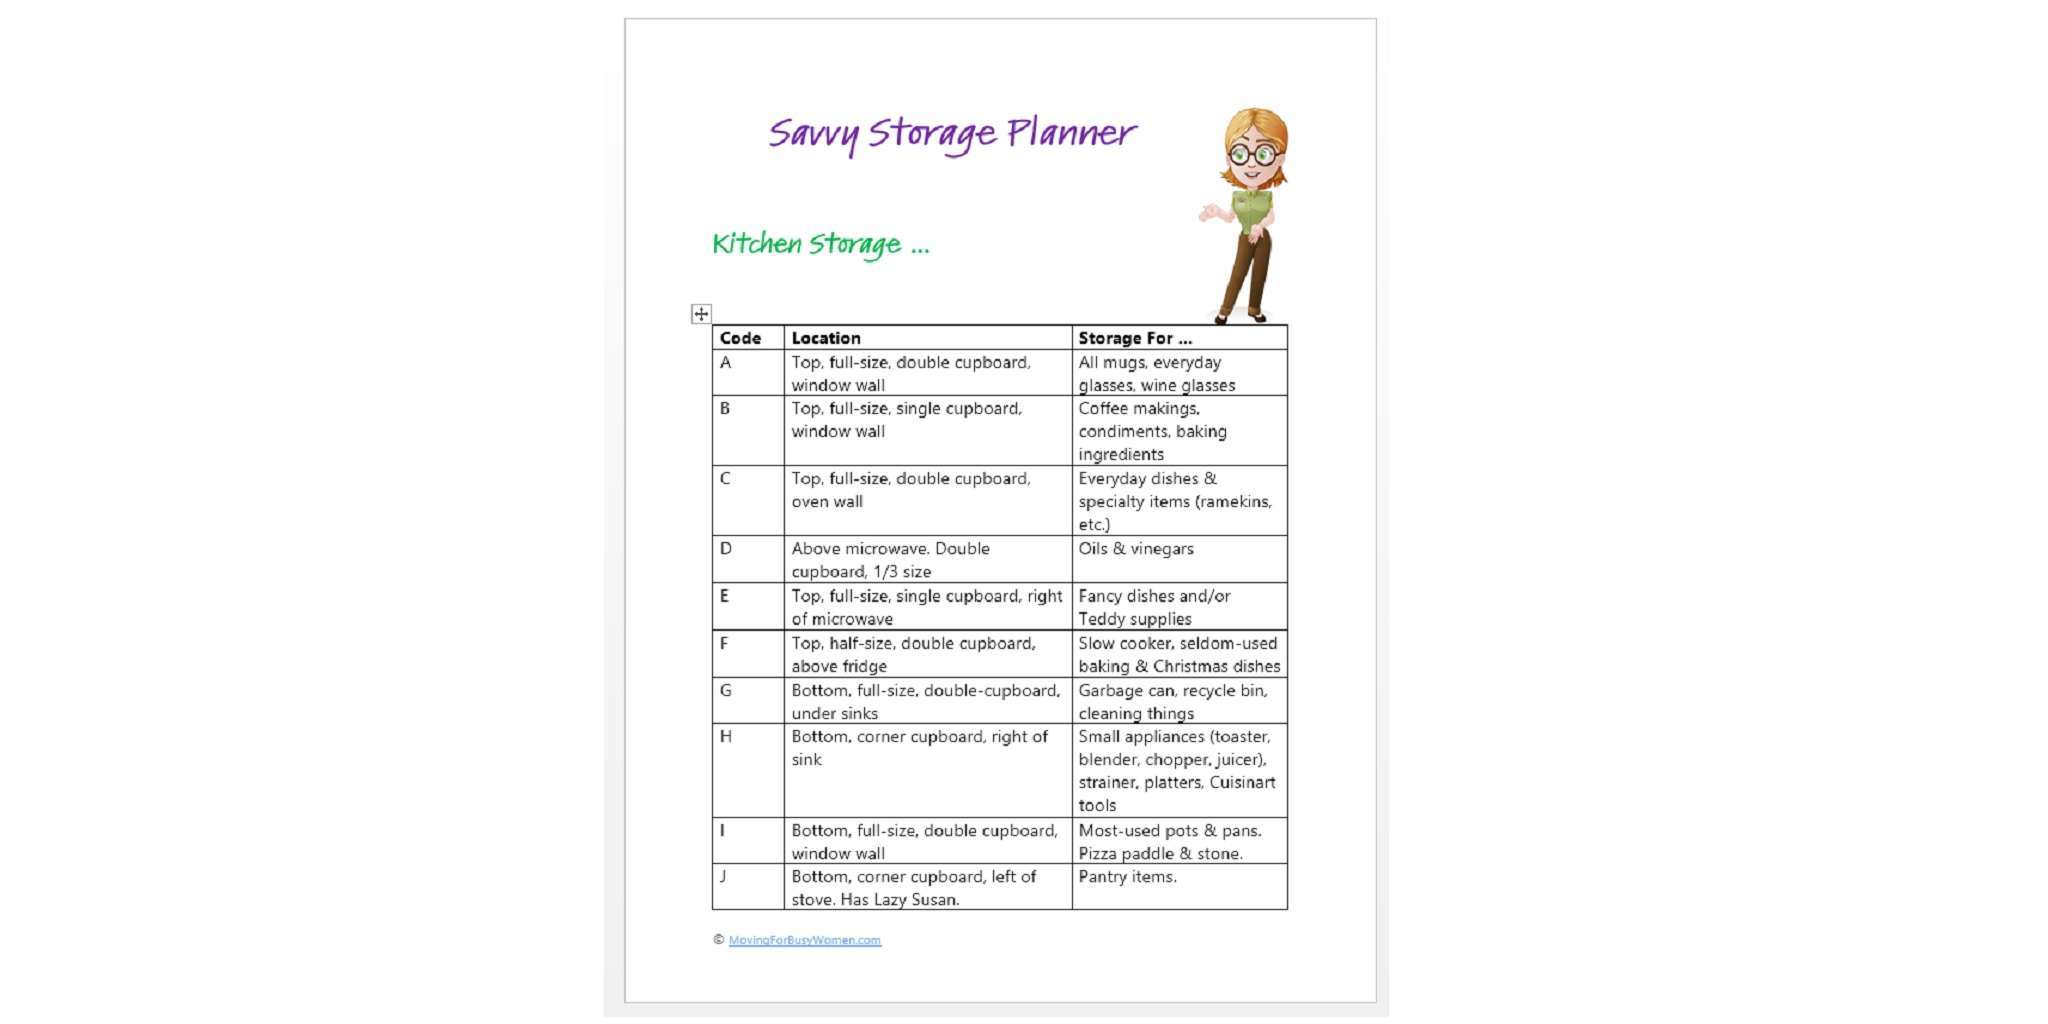
Finally, divide a sheet of paper into three columns
Write the code (letters or numbers) for that area in the left column, the location in the middle, and a description of what the area will contain on the right. Tweak as you go. Here’s an example page, to get you started:

You know, a big part of the anxiety that comes with moving is having to make so many decisions and to complete so many tasks in a short, intense time period. So the more time you invest in planning your move ahead of time, the more your future self will thank you!
Cover photo: Flickr/ wackystuff CC BY 2.0

